Thursday, 27 January 2011

Where is my Devore?!

Still waiting on shipment of my Devore that I bought A WEEK PAST MONDAY! I phoned the wifey up today (after sending TWO emails) and they "don't have it in stock yet, but we emailed you on the 19th to let you know... 1. Why did it not say 'Out of stock' on the website? and 2. They did not email me. "It might have been sent to your spam". It didn't. I'm getting slightly anxious now, as I have a week to finish the garment... Stress fest.

Anywhoos, rage face over, I completed my pigeon samples (from developments posted in 'Introducing... Carrier Pigeons' on 13/01), and here they are:


Both samples were constructed by using melted wax on white/black cotton jersey, which was then cooled and cracked. In between the cracks I applied black/white acrylic paint respectively. To remove the excess wax left on the surface of the sample, I ironed the material which was sandwiched between newspaper print. I had to do this numerous times until the fabric wasn't stiff, however, the stretch has been lost. Not great for my intended leggings. However, if my Devore had come... Did I mention I haven't received my Devore paste yet?

As well as these samples, I have been sketching some final garment design ideas:


This was intended to be a floor-length gown in black jersey with devore application and waxed feathers at the neckline. This is my favourite design, however, I won't be using it as the final garment for two reasons. Firstly, it doesn't have much of a textile element to it, and secondly, it isn't 'conceptual' enough. I might just have to make it for me...


I liked the second of the above two images more because I thought you'd be able to get a better view of the textile element here.  Both incorporate all four samples: QR Code, Stamp Quilting, EL Wire and devore jersey.

However, the winner was *drumroll*...


It's probably the weaker of the four drawings with regards to detail, but I like the way it will (hopefully!) show off each evolved mailing system on each of the three skirts at jaunty angles. I also like the bodice, which will be very fitted and covered in feather print. The whole dress will be made entirely of canvas, giving it the feel of old postal bags and rendering it stiff and structured. Contrast will be added with the leggings and sleeves in cotton jersey which should lend a dainty quality to the final garment.

Monday, 24 January 2011

'1 New Message'


This is my first attempt at using Electroluminescent Wire (EL Wire for short) and I'm pretty happy with the results! I bought 3m, complete with battery pack, for £8.95 from glow.co.uk. At first I tried to sew with invisible thread, but my machine didn't like it too much, so this is sewn with a blue cotton thread in zig-zag stitch. Once the wire is turned on, it gives off a strong blue glow, much like the alert system of mobile phones and email devices today. Another benefit of this wire is that it also has a two-speed flash function, as if you've just received a new text message.

I decided upon a simplified envelope icon in blue, white and pink EL Wire.  My ultimate aim is to have each coloured wire flash at different times (and to include a pocket on the final garment to store the battery packs in!)

Thursday, 13 January 2011

Stamps Galore!

I never quite understood the art that is stamp collecting...  It just seemed like a pinot-drinking toff's idea of a hobby.  However, I can see its appeal...  I went into WH Smith (home of your every stationery needs) and found a pack of about 50 collectible stamps - they are so engrossing!  I spent ages pouring over them, my favourite being a wonderful portrait of the ever-gracious, completely dignified Fergie and her poor husband, Prince Andrew.  I knew I had to include these intricate pieces somewhere!  So, here are my experimentations:


Above: Acetone Transfer

This is my new favourite transfer technique!  It's so easy, and everyone has the materials lying around the house to do this!  First, I selected the image I wanted to transfer, and mirrored the image.  Then, I printed it onto plain cartridge paper using an inkjet printer (this part is very important, it HAS to be inkjet to transfer, laser printers just do not work).  Take a piece of material, I used white cotton jersey for this, and lie the image face down onto your material.  Gently rub the back of image with nail varnish remover (NOT acetone-free), and lift the paper to reveal your newly transferred image - TA-DA!

Despite this being my favourite, I don't think I'll use this sample in my final piece.  The image is quite dreamy, which I love, but not for this project.  I want a crisp image on stiffer fabric...


Which brings us to the above image.  This is definitely more what I'm looking for.  This has been printed by sticking canvas to a piece of card using double-sided tape (I know the 'cool' thing to use now is Freezer Paper, but it's American and didn't have time to order it online - what's wrong with good, old fashioned double-sided tape anyway?!)  The canvas was cut to match the size of the card (A4), and fed directly through my inkjet printer.  So simple, yet so effective.


My stamp quilt!  The stamps I found in WH Smith were enlarged, their colours edited, and printed onto canvas using the technique described above.  This is them stitched together, and now I just have to add wadding to the back and get to work on those wavy postage marks.  Can you spot my favourite royal divorcees?

Introducing... Carrier Pigeons!

So I wanted to explore the 'You've Got Mail' theme from the very basic, early forms of the postal service, right up to the latest technology of today.  One of the earliest forms I could think of was homing pigeons, so I started looking at their feathers, their legs, the scrolls etc... Here is an exmple of my sketchbook work on carrier pigeons so far:


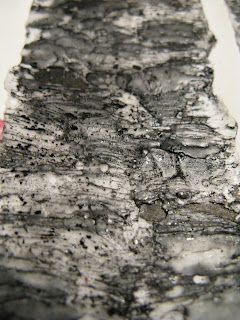
Here, I am looking at the detail of the leg, and below is a textile sample taken from the drawing.  I've created this surface on paper using charcoal, wax and Indian ink.  My aim for this sample is to transfer the same surface from paper to material for a pair of leggings or sleeves.  I was thinking about working in cotton jersey, and perhaps combining devore with white/black emulsion sprayed on top.  Any other suggestions, feel free to give me a shout - it would be greatly appreciated!:)


Below are some textile studies of feathers.  On top is a section of canvas employing various stitching techniques.  Beneath the canvas, I have trapped feathers in wax.  I really like the trapped feathers, but stitching into wax is a nightmare, so I'll have to look at other possibilities, such as laminating, latex, gelatine...  Don't know how that last one would work out, but it's worth a bash!


Below: Feathers coated in wax.  The dirty-looking brown ones were actually white, but I used Potassium Permanganate to give them this rotten, filthy pigeon look.  Very chic!


So, that's it for the first part of 'You've Got Mail'.  I really enjoyed working with feathers actually, which is surprising to me because they've always kind of creeped me out before! It's also sort of relevant, since The Black Swan comes out in cinema's next week... I'm so excited, I've been looking forward to its release since last summer!  I'll bet there are a lot of feathers and ballet-inspired clothes out this S/S!

Tuesday, 11 January 2011

Technology these days...

qrcode

Woop woop, QR Code generated! This code will be printed onto my final garment (after much experimentation with different transfer techniques which I will keep you updated on!) and will encourage people to interact with my garment. By taking photos of the code with your smartphone (I have it on good authority that Symbian and Android operating systems are enabled to do this automatically, but you can download the app for iPhones) you will be re-directed to this blog, where you can see the garment's design process from start to finish! Happy information sharing!:) x x x